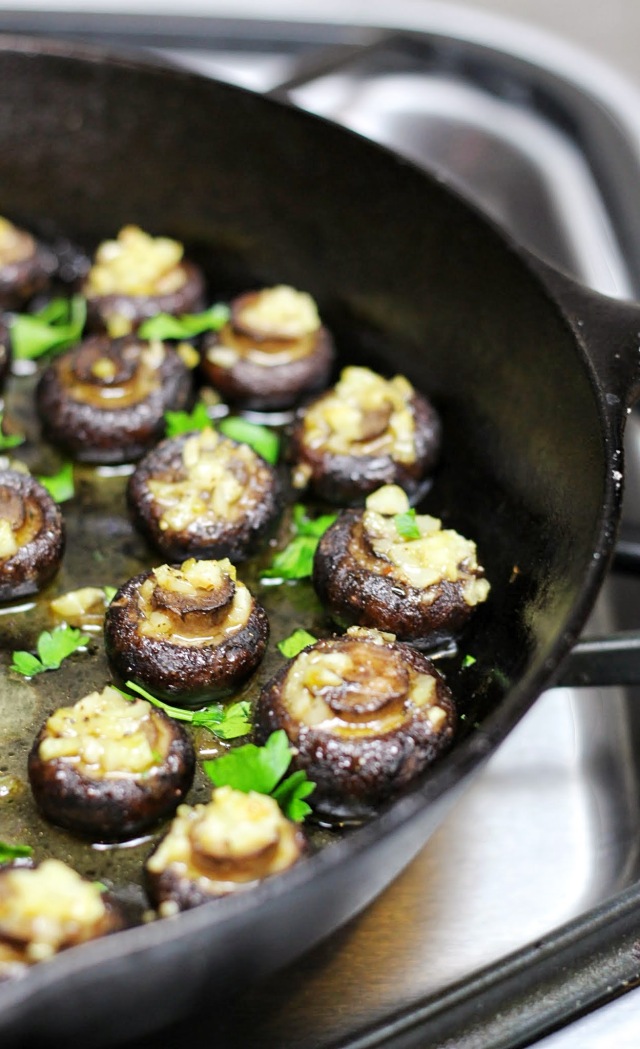
5 Ingredient Easy Garlic Butter Roasted Mushrooms.

Garlic Butter Roasted Mushrooms are a perfect appetizer or side dish–and they’re so easy to make!

IMG_1884

Mmmm. Mushrooms.
They’re so polarizing.
It seems like people either fanatically love them or absolutely loathe them.
Me?
I’m on Team Mushrooms all the way.
I’m the person who actively seeks out the dish with mushrooms on the menu.
And I’m guilty of taking the mushrooms off my husband’s plate because he won’t eat them.

So, I assume if you’re still reading that you’re on Team Mushrooms as well.
In which case, YOU NEED TO MAKE THESE GARLIC BUTTER MUSHROOMS.
They’re sooooo garlick-y and butter-y and mushroom-y. Yep. I’m making up words over here.
That’s how good they are.

IMG_1881

There are five (count ’em!), FIVE simple ingredients to make this dish.
Two of them are salt and pepper.
Do those even count? No? So really just 3 ingredients, then.
Garlic + butter + mushrooms = magic.

The big trick with the mushrooms comes to cleaning them.
You probably already know this, but you can’t rinse them under water.
Instead, you need to use a wet paper towel and gently wipe down each one.
It’s a little time consuming, but it’s worth it in the end!

IMG_1880 (2)

Two more things to note about the recipe:
#1: Trim the ends of the mushrooms so they’re flat and even with the rest of the mushroom. This will help the garlic stay on top of them instead of falling in between them.
#2: You will want to mince up your garlic as tiny as you possibly can so it’ll stay on the mushrooms.

5 Ingredient Easy Garlic Butter Roasted Mushrooms

Ingredients:

  • 16 oz white or baby bella mushrooms, cleaned with a wet paper towel
  • 1/4 cup butter (I used KerryGold grass-fed butter, but you can even make them vegan by using Earth Balance!)
  • 4 cloves of garlic, minced as finely as you can
  • salt
  • pepper

1). Place a large cast iron skillet in the oven and preheat it to 400F. If you do not have a cast iron skillet, you can use a pie pan or a casserole dish, but you will not preheat the oven with either of those inside.
2). Using a small knife, trim the ends of the mushrooms so they’re flat and even with the rest of the mushroom. Remove the cast iron skillet from the oven and carefully arrange the mushrooms in it.
3). Place the butter and garlic in a microwave safe bowl and microwave for about 30 seconds or until melted. Spoon the garlic butter over each mushroom cap. Make sure to try to keep the garlic on top of the mushroom instead of letting it fall in between. Season the tops with salt and pepper.
4). Roast for about 25-30 minutes until tender, basting them about halfway through the cooking time. Serve and enjoy!

Servings: 4. Approximate Nutritional Information per Serving: Calories: 131 Carbs:5g Fat: 12g Fiber: 1g Protein: 4g Points+:4 Recipe originally from here

French Dijon & Basil Potato Salad. (GF/DF)

 A simple French-inspired potato salad perfect for taking to a cookout or picnic this summer! 

IMG_1329

Sooooo I have a little-known fact about myself I’m going to share with you on this beautiful spring day.
Are you ready?
I really don’t care for mayonnaise-based salads.
Especially potato salads, but this also applies to pasta salads, tuna salads, etc.
I know, I know. It’s not a popular opinion. But hear me out.
One reason I don’t care for them is because they’re so heavy, but also because they aren’t conducive to al-fresco dining. You have to keep them cold and refrigerated otherwise you run the risk of making yourself or someone else sick.
Having to worry about that adds stress to what is supposed to be a stress-reducing experience!

That’s where this dijon and basil potato salad comes in. I swapped the mayo for a simple vinaigrette, and topped it off with fresh basil. You’re going to love it! I took it to a function recently and everyone went craaaazy over this simple salad.

Bonus: it happens to be gluten-free, dairy-free, egg-free, vegetarian and vegan, so hopefully everyone can enjoy it!

IMG_1331

Instead of mayonnaise, you’re going to make a simple vinaigrette with all the usual characters (olive oil, vinegar, dijon mustard, salt, and pepper). I add all the ingredients in a mason jar and shake it up, but you can whisk it together in a small bowl.

Quick trick I learned from my mom and grandma: pour the vinaigrette over the potatoes while they’re still warm so they absorb all the flavors. Then, you can finish it off with freshly chopped basil and it’s ready to go!

IMG_1327

I used baby red potatoes, but you can use yukon gold or whatever you have on hand! I hope you try this dish for your next picnic or cook out!

French Dijon and Basil Potato Salad

Ingredients:

  • 3lbs baby red potatoes, washed and quartered
  • 1 cup of fresh basil, chopped
  • sea salt and black pepper, to taste

For the vinaigrette:

  • 1/3 cup olive oil
  • 1/4 cup red wine vinegar
  • 1 tsp dijon mustard
  • 1/2 tsp sea salt, to taste
  • 1/2 tsp freshly ground black pepper

1). Place the quartered potatoes in a large pot with water and bring to a boil over medium-high heat. Reduce heat and simmer for about 15 minutes or until the potatoes are tender when pierced with a fork. Remove from heat and drain the water.

2). While the potatoes are boiling, place all the vinaigrette ingredients in a mason jar and shake until well combined. (You can also whisk them together in a bowl).

3). Let the potatoes cool. You want them warm, but not hot. Place them in a large bowl and season them with salt and pepper. Pour the vinaigrette over them. Add the basil and toss to combine. Taste and re-season with more salt or pepper. Enjoy!
*Note: This dish is best served warm or at room-temperature, but you will need to refrigerate any leftovers.

Servings: about 8. Approximate Nutritional Information per Serving: Calories: 201 Carbs: 27g Fat: 9g Fiber: 3g Protein: 3g Points+: 5 Recipe adapted from here. Adapted recipe courtesy of Audrey’s Apron.

Coconut Key Lime Energy Bites + 2 Year Blog Anniversary! (GF, DF, Paleo)

Slightly tangy but sweet, these coconut lime energy bites are a perfect light dessert or healthy on-the-go snack option!

IMG_1790

My blog turns 2 today, and I’m celebrating with a healthy little sweet treat: coconut key lime energy bites! If you’ve been reading Audrey’s Apron from the beginning, you know this blog idea had been a long-time dream of mine since college and I finally put it into motion 2 years ago today. A lot has changed in the 2 years that I’ve been blogging. I’m thrilled that so many of you follow this little cooking journey of mine. And it really does make my day when you comment that you made a recipe and loved it!

The biggest change on the blog this year? Probably my photography skills! It’s still a work in progress, for sure, but at least I’m not taking pictures with my phone camera anymore! OH the horrors! My ever-supportive husband got me a real, legit DSLR camera for my birthday this year and it has been so fun using it!

So, I just want to say THANK YOU for following, reading, commenting, tweeting, etc. I love sharing our culinary successes together!

IMG_1785

Back to this yummy recipe. I found these to be a perfectly delicious paleo substitute for key lime pie. They’re much healthier, and bite-sized, so that’s a win!

The coconut is totally optional, by the way.
I just love how it makes them look sort of like little snowballs.
Or truffles.
Yum!
So for all you coconut-averse readers, just know it’s more for aesthetics and you can definitely leave it off.

A word of wisdom: make sure that your dates are in fact pitted before you throw them in your food processor and turn it on.
Otherwise it will begin to jump wildly all over the counter while making an AWFUL noise.
Don’t ask me how I know, just promise me you’ll double check, ok? Ok.
P.S. The dates I bought from Costco most definitely did have pits in them. #IwishIwouldhavedoublechecked.

IMG_1792

So the great thing about this recipe is that the food processor does all the work for you! Throw in some cashews, almonds, dates (pitted!), lime zest & juice, and turn it on! Then all you have to do is form the mixture into little balls and roll them into coconut if you so choose.

Pack them in your lunch, serve them as dessert, or keep a few in your purse for emergencies–these chewy energy bites are perfect for whenever you need a quick boost!

Coconut Key Lime Energy Bites

Ingredients:

  • 1/2 cup cashews
  • 1/2 cup almonds
  • 1 1/2 cups medjool dates, pitted
  • Zest and juice from 2 limes
  • 1/4 cup unsweetened shredded coconut for rolling, optional

1). In a food processor, add the cashews and almonds. Pulse until the nuts are finely chopped.

2). Add the dates and lime zest and juice. Pulse until the dates are finely chopped and the mixture begins to clump together.

3). Scoop about a tablespoon of the mixture out and roll it into a ball. Roll in shredded coconut if desired, then repeat with remaining mixture. Store in an airtight container on the counter for up to 4 days, or in the fridge. Enjoy!

Servings: about 15. Approximate Nutritional Information per Serving: Calories: 74 Carbs: 9g Fat: 4g Protein: 2g Fiber: 1g Points+: 2 Recipe adapted from here. Adapted recipe courtesy of Audrey’s Apron.

Roasted Red and Sweet Potatoes with Rosemary. (GF)

Red potatoes and sweet potatoes roasted together with rosemary make a simple, easy side dish perfect for any meal.

IMG_1728

I recently fell in love with the flavor combination of rosemary and sweet potatoes. There’s something so earth-y and wonderful about the two that make them go together so well. It’s a simple combination, really, but not one that I made at home before, and this dish lived up to all of my expectations. It’s hard to go wrong with potatoes though, am I right?

Even though I 110% adore sweet potatoes, for whatever reason I equally wanted red potatoes when I made this dish, hence the decision to mix them together. This also made my husband happy since he typically prefers red potatoes over sweet any day. All that to say, every potato lover in your family will be happy when you serve them these! You can also use regular white potatoes if you prefer, or even use only sweet potatoes!

Reason #274 why I love this dish: I love any excuse to gather fresh rosemary from our back yard. If you’ve ever wondered if you should plant a rosemary bush, the answer is a resounding yes! It’s so convenient to never worry about running out.

IMG_1722-001
These potatoes roast low and slow in the oven, leaving you with plenty of time to focus on the main dish while they do their thing in the oven. It’s brutally cold and windy out, and this side dish screams warm and cozy, which is exactly what I want in my life right now! I hope you enjoy it!

Roasted Red and Sweet Potatoes with Rosemary (GF)

Ingredients:

  • 1 Tbsp grass-fed butter (or olive oil for dairy-free/vegan)
  • 2 Tbsp olive oil
  • 2 large sweet potatoes, peeled and cut into 1 inch cubes
  • 1 1/2 lbs red potatoes, cut into 1 inch cubes
  • 1 1/2-2 Tbsp fresh rosemary, chopped
  • 1 1/2 tsp sea salt and 1/2 tsp freshly ground black pepper, or more to taste

1). Preheat the oven to 350F. Place the butter in a 9×13 pan and put it in the oven for a couple minutes to melt the butter. Remove from oven and add the remaining ingredients, tossing well to ensure even seasoning.

2). Roast for about an hour, stirring 2-3 times, until the potatoes are golden and tender.

Servings: about 8. Approximate Nutritional Information per Serving: Calories: 159 Carbs: 26g Fat: 5g Protein: 3g Fiber: 3g Sugar: 4g Points+: 4. Recipe adapted from here.

No-Bake Chocolate Almond Butter Cups. (GF, DF)

A rich gluten-free, dairy-free dessert without refined sugars! Keep a stash in your freezer to satisfy your next sweet tooth!

IMG_1577
Um, guys?

This recipe is a game-changer. I’m struggling to find the words to accurately convey to you how incredibly awesome these little chocolate almond butter cups are! The flavor. The texture. The chocolate!

They. Are. Delicious!!

IMG_1570

And the best part? This is a guilt-free dessert that doesn’t taste like one. Don’t you hate biting into a “healthy” dessert only to be left wishing for the real deal? Not here. My husband and I were absolutely SHOCKED at how good these were, and not in a that’s-good-considering-it’s-a-paleo-treat kind of way. These are just plain ol’ GOOD. I made these after having eliminated refined sugars for two months and I was on a mission to make something that tasted great but was not full of sugar. The only source of sweetness in these chocolate cups comes from a minimal amount of maple syrup, so they are refined-sugar free. But again, you’d never guess it!

IMG_1579

To make these amazing little cups of yummyness, combine almond flour, a touch of maple syrup, coconut oil, cinnamon, vanilla, and almond butter. One taste of this mixture and you know things are headed in a great direction. That all gets pressed down into muffin tins.

I used a regular muffin pan, but if you want to make them more bite-sized you can use a mini-muffin pan if you have one.

Then, the chocolate sauce.

Confession time.

I had no idea making chocolate could be this easy! Just mix melted coconut oil, maple syrup for sweetness, and pure cocoa powder. The result? Silky, rich chocolate sauce! Pour this on top of the almond butter mixture, top with flaked sea salt and/or sliced almonds, and freeze for about 30 minutes.

Seeeee? Easy! These are my new favorite dessert.

IMG_1573

You do need to keep these cold so the chocolate doesn’t start to melt, but I love having them in the freezer and pulling one out on occasion for a satisfying dessert made of real ingredients and minimal sugar.

P.S. I know these aren’t traditional Christmas cookies, but I think they’d be a great addition! They would cater to every family member’s special dietary needs (gluten-free, dairy-free, paleo, vegan, vegetarian, etc.) and still taste amazing. Plus, you can make them ahead of time!

Here’s a quick video I made explaining how to make them!

No-Bake Chocolate Almond Butter Cups (GF, DF, Paleo, Vegan)

For the almond butter base:

  • 1 3/4 cups almond flour
  • 2 Tbsp almond butter
  • 2 Tbsp coconut oil, melted
  • 2 Tbsp maple syrup, warmed if refrigerated
  • 1/4 tsp cinnamon
  • 1/4 tsp vanilla extract
  • pinch of fine grain sea salt, to taste

For the chocolate sauce:

  • 3 Tbsp coconut oil, melted
  • 3 Tbsp pure maple syrup, warmed if refrigerated
  • 2 Tbsp cocoa powder
  • pinch of sea salt, to taste

Optional toppings: flaked sea salt, sliced almonds, coconut, etc.

1). Line a muffin pan with liners and make sure there is enough room in the freezer for the muffin pan.

2). In a large bowl, combine all of the ingredients for the base. The dough should be a little bit sticky similar to the texture of cookie dough.

3). Equally distribute the dough into the bottom of the muffin pans (I got 9 thick cups). Press down until it is smooth and flat.

4). In a small bowl, combine the chocolate sauce ingredients, whisking together until smooth. Equally spoon the chocolate over the base of the cups. Top with flaked sea salt and/or sliced almonds, coconut, etc.

5). Place the muffin pan in the freezer for about 30 minutes before enjoying. Store remaining cups in the freezer until ready to eat. These are delicious straight from the freezer!

Servings: 9 (large) cups. Approximate Nutritional Information per Serving: Calories: 266 Carbs: 11g Fat: 21g Protein: 6g Fiber: 3g Sugar: 8g Points+: 7 Recipe adapted from here.

Adapted recipe courtesy of Audrey’s Apron. 

Butternut Squash Soup (GF, DF, Paleo) — Guest Post

IMG_1527

Today I’m posting a delicious, healthy butternut squash soup recipe over on Vylette. I met Julie, the author behind the blog, at the Maiedae mixer a couple months ago and have stayed in touch ever since! Julie has such a warm, inviting personality and I’m so glad we started chatting at the mixer. She’s one of those people you can instantly connect with. I am honored she asked me to post on her blog. Her posts are always beautiful and inspiring!

Since we’re still in Thanksgiving-countdown mode, I wanted to share an easy recipe you just might not have thought of yet that would be perfect for the holiday: butternut squash soup! I make it several times each fall and it is naturally gluten free, and can easily be made dairy free, paleo, vegetarian, and vegan! Hooray for addressing everyone’s dietary concerns!

Click here to check out the full recipe and see all of the wonderful posts Julie has on her lifestyle blog!

IMG_1538

Questions? Comments? Let me know!

Easy Homemade Balsamic Vinaigrette.

My go-to balsamic vinaigrette recipe–quick, healthy, and easy!

IMG_1361

I can’t help but think about all the holidays (also: holiday food) that will be here soon, so I’m hoping this recipe will make eating salads more exciting in the meantime! Once the weather turns cold I don’t find myself craving crisp salads as much, but thankfully here in the south we’re still having highs in the 80’s, and my tomato plant is still producing lots of tomatoes, so salads are here to stay for now!

But let’s be honest…with a vinaigrette this delish we eat salads year-round.

Making a homemade vinaigrette is easy and I PROMISE it barely takes 5 minutes, but it makes a huge difference in the end result of your salad. I’m the first to admit that I don’t aaaaaaaalways make my own dressings, but I really prefer them. Not only do you have 100% control over every ingredient (goodbye crazy ingredients you can’t pronounce!), but they just have so. much. flavor!

IMG_1363

I like making my vinaigrettes in mason jars because I can measure straight into the jars, AND shake ’em up right in the container before serving. I also prefer using agave nectar over honey, but if you don’t have any agave nectar you can make that substitution. I also like a tart vinaigrette, but if you taste it and find it’s too tart for your liking, simply increase the olive oil by about 1/4 cup. It will dilute the balsamic vinegar for you.

IMG_1368

One of my favorite salad combinations? Lettuce, homegrown tomatoes, cucumbers, bell peppers, avocado, a sprinkle of feta cheese, and this vinaigrette. Add some grilled chicken and you have yourself a complete meal!

Easy Homemade Balsamic Vinaigrette.

  • 1/2 cup EVOO
  • 1/3 cup balsamic vinegar
  • 1-2 tsp agave nectar (start with 1 and add more from there if it tastes too tart)
  • 1 tsp dijon mustard
  • sea salt and black pepper

1). Combine all ingredients in a jar (or bowl) and shake (or whisk) to combine.

Servings: about 12. Nutritional Information per Serving: Calories: 90 Carbs: 2g Fat: 9g Points+: 3 Recipe courtesy of Audrey’s Apron.

Roasted Tomato, Basil, and Garlic Sauce.

An easy, home-made version of my favorite jarred marinara sauce made with roasted tomatoes, garlic, onion, carrots, and fresh basil!

IMG_1422

I’m pressing pause on the apple, cinnamon, pumpkin-everything recipes, even though we’re a few days away from the official start of fall. My garden is exploding with beautiful summer fruit (now more-so than ever!), and I bet I’m not the only one!

If you follow me on Instagram, you know this year was my first year planting a garden, and you also know I recently harvested dozens of tomatoes. Until now, I’ve been able to pick a couple tomatoes from the garden each day ad incorporate them in simple caprese or garden salads. Last weekend was a game-changer! I had two buckets full of tomatoes and I realized I was going to have to use them up in a large quantity all at once.

IMG_1410
I asked for your opinion on what I should make. Some said marinara, some said salsa, and some said gazpacho. Having spent time in Spain, I loooove gazpacho and was ready to make it until I realized I would be the only one in my family eating it. I was leaning toward marinara sauce, but I dreaded having to peel so many tomatoes. I know the trick about blanching them in boiling water, but it still seemed overly time-consuming. I wanted big flavor without slaving away in the kitchen all day, ya know?

Thankfully, an extended family member suggested an easier alternative to marinara sauce that included roasting the tomatoes first (hooray for not peeling tomatoes!!!). I tweaked her recipe a little bit and included carrots for some sweetness with the onion and garlic.

IMG_1418

Oh, and I roasted a WHOLE head of garlic for this recipe. I’m glad I did, because the garlic flavor was still subtle even with the large quantity I used! Have you ever roasted garlic before? I hadn’t either–but it is SOOOOO easy. Much faster than having to take out individual cloves. Are you ready? It’s done in 3 steps

1). Cut the top (pointy) side of the garlic bulb about 1/3 of the way down, so the tops of the garlic cloves are exposed.

2). Drizzle with olive oil, salt, and pepper.

3). Wrap in foil and place in the oven. Ta-da!

IMG_1406

I am probably going to be roasting garlic for everything now! The little garlic foil packet roasted right on the oven rack next to my giant pan of tomatoes and veggies for about 40 minutes. More room on my baking pan = more tomatoes get used!

IMG_1398

When the liquid in the veggies has evaporated and all the tomatoes are shriveled up (lovely imagery, no?), you know they’re ready to take out. For me, that was about 40-45 minutes at 400F. Let them cool a little bit and then get out the food processor.

IMG_1402

Seriously, I love my food processor. It makes fancy sauces so easy. If you don’t have one, use a blender. Scraaaaaaaaaaape all that yummyness off the pan, straight into the food processor. Don’t forget about the garlic!! The cloves are soft and easy to squeeze out, so add them all to the big roasted veggie party. Did I just call it a party? Yes I did.

IMG_1411

Taste and add whatever you think would be good: balsamic vinegar, more olive oil, parmesan cheese, more seasoning, a touch of sugar, fresh basil, etc. I love basil in my sauce, so I added a small handful of leaves and processed them together. My sauce was thick (which I actually like), but you can thin yours out with more olive oil if you prefer a looser sauce.

IMG_1424

What do you like to do with fresh tomatoes? Let me know in the comments!

Roasted Tomato, Basil, and Garlic Sauce

Yield: about 2 cups.

Ingredients:

  • 1/2 large onion, roughly chopped
  • 1 carrot, chopped
  • 1-2 dozen chopped tomatoes, depending on size. (I used cherry and regular tomatoes, enough to fill 1 large baking sheet)
  • 3 tbsp olive oil
  • Freshly cracked sea salt and pepper
  • 1 whole garlic bulb
  • Fresh basil (I used about 8 leaves)

1). Pre-heat the oven to 400F. For the roasted garlic: cut off about 1/3 of the top of the garlic bulb (pointy side). Cut enough so the tops of the garlic cloves are now exposed. Place on foil, drizzle with a little bit of olive oil, salt and pepper. Wrap up tightly and bake directly on the oven rack with the tray of tomatoes.

2). Place the chopped tomatoes, carrot, and onion on a large baking sheet. Drizzle with olive oil, salt, and pepper. Toss to combine. Bake for 40-45 minutes or until most of the liquid has evaporated.

3). Remove the garlic and veggies. Let them cool about 15 minutes before scraping into the food processor. Add a small handful of fresh basil. Pulse until smooth. Taste and re-season, if necessary. You may need to add more olive oil for a looser sauce, balsamic vinegar for tang, sugar to sweeten, or more basil based on your preferences!

Recipe courtesy of Audrey’s Apron. Thanks to family for the inspiration!!


Caprese Quinoa Salad.

A healthy, easy side dish filled with bright mediterranean flavors!

IMG_1218-001

Tomatoes + basil = perfection, am I right? I never get tired of that flavor combination.

I know adding mozzarella to the mix is the most traditional option, but I decided to use feta instead. It’s still very mediterranean, but more flavorful in my opinion. Feta is slightly more tangy and salty than mozzarella, and I think it worked great here. If you prefer mozzarella, use it!

IMG_1214-001

If you have a garden, this is the perfect way to use up a lot of fresh tomatoes and basil. It’s amazing how such simple ingredients can be so good, am I right? Complicated recipes have their time and place, but this is not one of them, making it perfect for a weeknight meal. Toss all the ingredients together in a bowl and you’re good to go!

I served this with grilled chicken breast, but this would be great with fish, pork, beef, whatever! And, if you’re vegetarian, this could become a main dish. You can eat it warm, at room temperature, or cold from the fridge. The leftovers were great, too!

IMG_1216-001

Do you like caprese salads? Tell me your opinion in the comments section below!

Caprese Quinoa Salad

Ingredients:

  • 1 cup uncooked quinoa
  • 2 cups low-sodium chicken broth
  • 1 cup of cherry tomatoes, cut in half
  • 10-15 basil leaves cut chiffonade
  • 3/4 cup crumbled feta cheese (or mozzarella)
  • 1 Tbsp olive oil
  • 3-4 Tbsp lemon juice or rice wine vinegar
  • Generous amount of sea salt (about 3/4 tsp) and freshly cracked black pepper (about 1/2 tsp), to taste

1). In a medium saucepan, bring the chicken broth and quinoa to a boil. Cook according to package directions, about 15-18 minutes or until all the broth is absorbed. Move the quinoa to a large bowl to let it cool.

2). Add all the remaining ingredients to the bowl of quinoa, tossing to combine well. Taste and re-season, if necessary. Enjoy immediately or cover and refrigerate.

Servings: about 8 1-cup servings. Approximate Nutritional Information per Serving: Calories: 157 Carbs: 17g Fat: 7g Protein: 7g Fiber: 2g Sugar: 2g Points+: 4.
Recipe courtesy of Audrey’s Apron.

Vanilla Almond Granola.

Slightly sweet, crunchy granola with hints of vanilla, almond, and cinnamon flavor!  Surprisingly easy and much more affordable than the store-bought variety.

IMG_1167

School is back in session and this teacher has been going 100 miles a minute! But seriously. The beginning of the school year is always so hectic. Awesome and exciting, too, but also very hectic.

IMG_1179

Know what’s great on hectic mornings?

Vanilla Almond Granola. Homemade, of course! I can’t believe I’ve never made this stuff before. It’s so much cheaper than buying it pre-made and it’s absolutely delicious! The addition of a tiiiny bit of almond extract is brilliant–it brings out the almond flavor just the right amount without being overpowering.

IMG_1173

I love sprinkling this it on plain Greek yogurt. It makes for a quick, healthy breakfast with virtually no prep-time required.

IMG_1176

The granola adds a necessary crunch, texture, and touch of sweetness to the otherwise tart yogurt. Something about the contrast between the creamy yogurt and slightly crunchy granola just works, ya know? Sprinkle some ripe berries on top and you’ve got yourself a filling meal loaded with all kinds of yummyness.

IMG_1180

I know you don’t need another reason to make this super easy recipe, but here’s one more anyway: your house will smell AMAZING for hours after you make this. Cinnamon and vanilla always seem to exude the most awesomely sweet, warm aroma when baked.

Plus, all you need are two mixing bowls to make it!

IMG_1161

One small note about this recipe: yes, it calls for coconut oil, but you won’t taste it. I promise. My husband hates coconut and he had no idea I used coconut oil in the granola. If you’re allergic or still don’t believe me, feel free to substitute some vegetable oil.

IMG_1162

Do you like granola? What’s your favorite variety? Let me know in the comment section!

Vanilla Almond Granola

Ingredients:

  • 2 1/2 cups old-fashioned rolled oats (not quick cooking)
  • 3/4 cup slivered almonds
  • 1/2 tsp ground cinnamon
  • 1/4 tsp salt
  • 1/2 cup pure maple syrup
  • 1/4 cup melted coconut oil (or vegetable/canola oil)
  • 1/4 tsp almond extract
  • 1 tablespoon vanilla extract

1). Preheat the oven to 300F. Line a large baking sheet with either parchment paper or a silicone baking mat.

2). In a large bowl, combine the oats, almonds, cinnamon, and salt.

3). In a medium bowl, whisk the syrup, oil, almond extract and vanilla extract together until well combined. Pour over the oats and toss well.

4). Spread the granola on the pan in one even layer. Bake for 40-45 minutes, stirring every 15 minutes (<–very important!!). Let the granola cool before consuming.

Servings: about 13 servings of 1/4 cup each. Nutritional Information per Serving: Calories: 171 Carbs: 20g Fat: 9g Protein: 4g Fiber: 2g Sugar: 9g
Recipe: http://sallysbakingaddiction.com/2014/06/17/vanilla-almond-granola/